개발자라면 누구나 도전해보는 기술 블로그와 깃꾸(깃허브 꾸미기!)
저는 Velog와 Tistory 두 플랫폼을 동시에 사용하고 있는데요, 최근 GitHub 프로필에 두 블로그의 최신 포스트를 자동으로 표시하도록 만들어보았습니다!
💡 이 글에서 다룰 내용
- RSS와 GitHub Actions를 활용한 자동화
- Node.js를 이용한 RSS 피드 파싱
- GitHub 프로필 README 자동 업데이트
- 전체 프로세스 이해하기
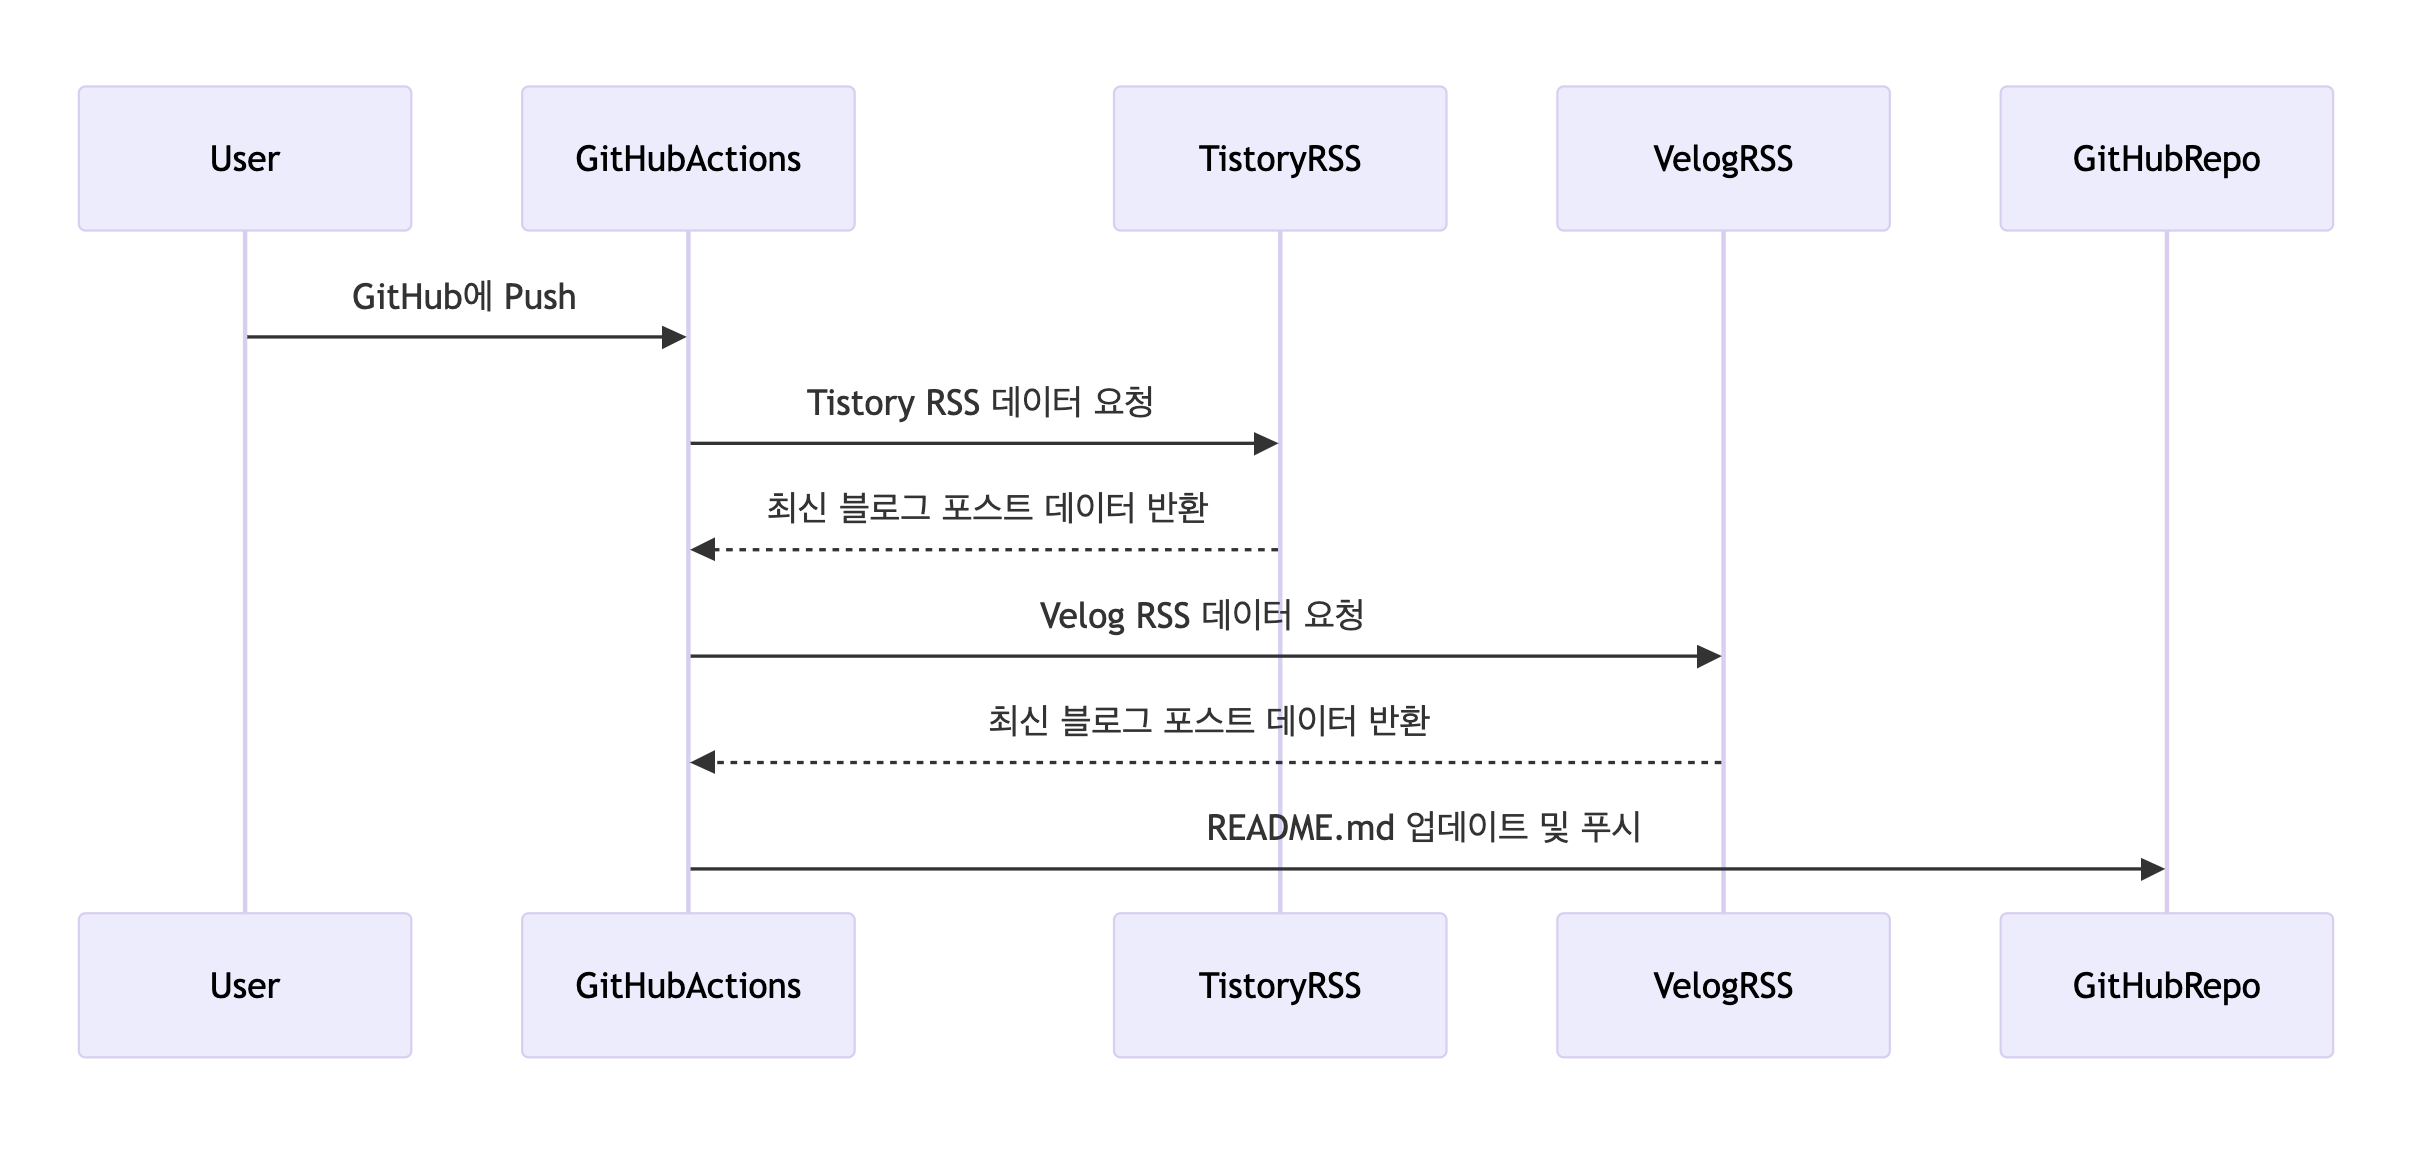
전체 프로세스 살펴보기
먼저 우리가 만들 자동화 시스템의 전체 흐름을 살펴봅시다.
GitHub Actions와 RSS 피드
가 궁금하시다면 이전 피드를 확인해주세요.
GitHub Actions는 GitHub에서 제공하는 강력한 CI/CD(Continuous Integration and Continuous Delivery) 도구입니다. 특정 이벤트가 발생했을 때 자동으로 작업을 실행할 수 있게 해주죠.
🔍 GitHub Actions의 주요 특징
.github/workflows디렉토리에서 설정- YAML 파일로 워크플로우 정의
- 다양한 트리거(push, 스케줄 등) 지원
- 자동화된 테스트 및 배포 가능
RSS 피드 활용하기
RSS(Really Simple Syndication)는 웹사이트의 최신 콘텐츠를 XML 형식으로 제공하는 표준입니다.
📢 블로그별 RSS 주소
Tistory |
https://<블로그 주소>/rss
Velog |https://v2.velog.io/rss/@<사용자명>
0. 프로젝트 설정하기
자동화를 시작하기 전에 필요한 것들을 준비해봅시다.
# GitHub 프로필 저장소 클론
git clone https://github.com/<username>/<username>.git

# Node.js 프로젝트 초기화
npm init -y

# RSS 파서 설치
npm install rss-parser --save
GitHub Actions 워크플로우 작성하기
readme 파일이 들어가는 깃허브 레포지토리에 .github/workflows/update-readme.yml 파일을 만들어 워크플로우를 정의합니다.
name: Update README with Blog Posts

on:
  schedule:
    - cron: "0 */1 * * *"
  push:
    branches:
      - main

jobs:
  update-readme:
    runs-on: ubuntu-latest
    steps:
      - name: Checkout repository
        uses: actions/checkout@v3

      - name: Set up Node.js
        uses: actions/setup-node@v3
        with:
          node-version: "16"

      - name: Install dependencies
        run: npm install rss-parser

      - name: Run update script
        run: node readmeUpdate.js

      - name: Commit README
        run: |
          git config --local user.name "YourGitHubUsername"
          git config --local user.email "YourEmail@example.com"
          git add README.md
          git commit -m "Update README with latest blog posts" || echo "No changes to commit"
          git push
        env:
          GITHUB_TOKEN: ${{ secrets.GITHUB_TOKEN }}
RSS 피드 파싱 스크립트 작성하기
readmeUpdate.js 파일을 만들어 RSS 피드를 파싱하고 README를 업데이트하는 로직을 구현합니다.
import { readFileSync, writeFileSync } from "node:fs";
import Parser from "rss-parser";

const readmePath = "README.md";
let readmeContent = readFileSync(readmePath, "utf8");
const parser = new Parser();

(async () => {
    const tistoryFeed = await parser.parseURL("https://realalpaca01.tistory.com/rss");
    const velogFeed = await parser.parseURL("https://v2.velog.io/rss/@yujin_jeong");

    let tistoryPosts = "### Tistory Latest Blog Posts\n\n";
    for (let i = 0; i < 5 && i < tistoryFeed.items.length; i++) {
        const { title, link } = tistoryFeed.items[i];
        tistoryPosts += `- [${title}](${link})\n`;
    }

    let velogPosts = "### Velog Latest Blog Posts\n\n";
    for (let i = 0; i < 5 && i < velogFeed.items.length; i++) {
        const { title, link } = velogFeed.items[i];
        velogPosts += `- [${title}](${link})\n`;
    }

    const combinedPosts = `${tistoryPosts}\n${velogPosts}`;
    const newReadmeContent = readmeContent.includes("### Tistory Latest Blog Posts")
        ? readmeContent.replace(/### Tistory Latest Blog Posts[\s\S]*?(?=### Velog Latest Blog Posts|$)/, combinedPosts)
        : readmeContent + "\n" + combinedPosts;

    if (newReadmeContent !== readmeContent) {
        writeFileSync(readmePath, newReadmeContent, "utf8");
        console.log("README.md 업데이트 완료");
    } else {
        console.log("새로운 블로그 포스트가 없습니다.");
    }
})();
최종 결과물
성공적으로 설정이 완료되면, GitHub 프로필의 README.md는 다음과 같이 자동으로 업데이트됩니다:
### Tistory Latest Blog Posts
- [깃허브 액션으로 자동화하기](https://realalpaca01.tistory.com/1)
- [Node.js로 RSS 피드 읽기](https://realalpaca01.tistory.com/2)

### Velog Latest Blog Posts
- [GitHub Actions 시작하기](https://v2.velog.io/@yujin_jeong/1)
- [RSS와 친해지기](https://v2.velog.io/@yujin_jeong/2)
마치며
이렇게 GitHub Actions와 RSS를 활용하여 블로그 포스트를 자동으로 관리하는 방법을 알아보았습니다.
🌟 Tip
- 코드는 여러분의 상황에 맞게 수정해서 사용하세요
- GitHub Actions의 실행 주기는 필요에 따라 조절할 수 있습니다
- RSS 피드 주소는 반드시 본인의 것으로 변경해야 합니다
https://dawonny.tistory.com/m/468
해당 블로그를 참고하여 만들었습니다 :)