
이전 포스트에서는 Python 코드에서 Ollama 명령어를 활용하여 로컬에서 LLM을 호출하는 방법을 알아보았습니다.
이번에는 LangChain의 ChatOllama를 중심으로, LLM을 하나의 대화형 컴포넌트로 사용하는 법을 구체적으로 다뤄보겠습니다.
LangChain은 대규모 언어 모델을 실제 애플리케이션으로 구현할 수 있도록 돕는 Python 프레임워크이며,
ChatOllama는 LangChain이 Ollama와 연동될 수 있게 해주는 핵심 모듈입니다.
참고 문서
✅ 환경 구성
1. 필요한 패키지 설치
먼저 다음 패키지들이 설치가 되어야 아래 코드들을 실행할 수 있습니다.
pip install -U ollama langchain-core langchain-ollama langchain-community최신 버전의 Ollama와 LangChain을 사용하는 것이 중요합니다.
tool calling,streaming,structured output등의 기능은 최신 API 버전에서만 지원됩니다.
2. 모델 다운로드
ollama pull llama3.1:8b
ollama pull llava-llama3
모델 목록 확인:
ollama list💡 핵심 클래스: ChatOllama
ChatOllama는 LangChain의 BaseChatModel을 상속한 클래스로, Ollama 서버에서 실행 중인 LLM을 사용하여 채팅 스타일의 응답을 생성합니다.
기본 사용법
from langchain_ollama import ChatOllama
from langchain_core.prompts import ChatPromptTemplate
from langchain_core.output_parsers import StrOutputParser

# 모델 로드
llm = ChatOllama(model="llama3.1:8b", temperature=0.7)

# 프롬프트 템플릿 설정 (선택 사항이지만 권장)
prompt = ChatPromptTemplate.from_messages([
    ("system", "You are a helpful assistant."),
    ("user", "{input}")
])

# 출력 파서 설정 (LLM의 출력을 문자열로 파싱)
output_parser = StrOutputParser()

# 체인 구성
chain = prompt | llm | output_parser

# 답변 요청
question = "대한민국의 수도는 어디인가요?"
response = chain.invoke({"input": question})

# 답변 출력
print(f"질문: {question}")
print(f"답변: {response}")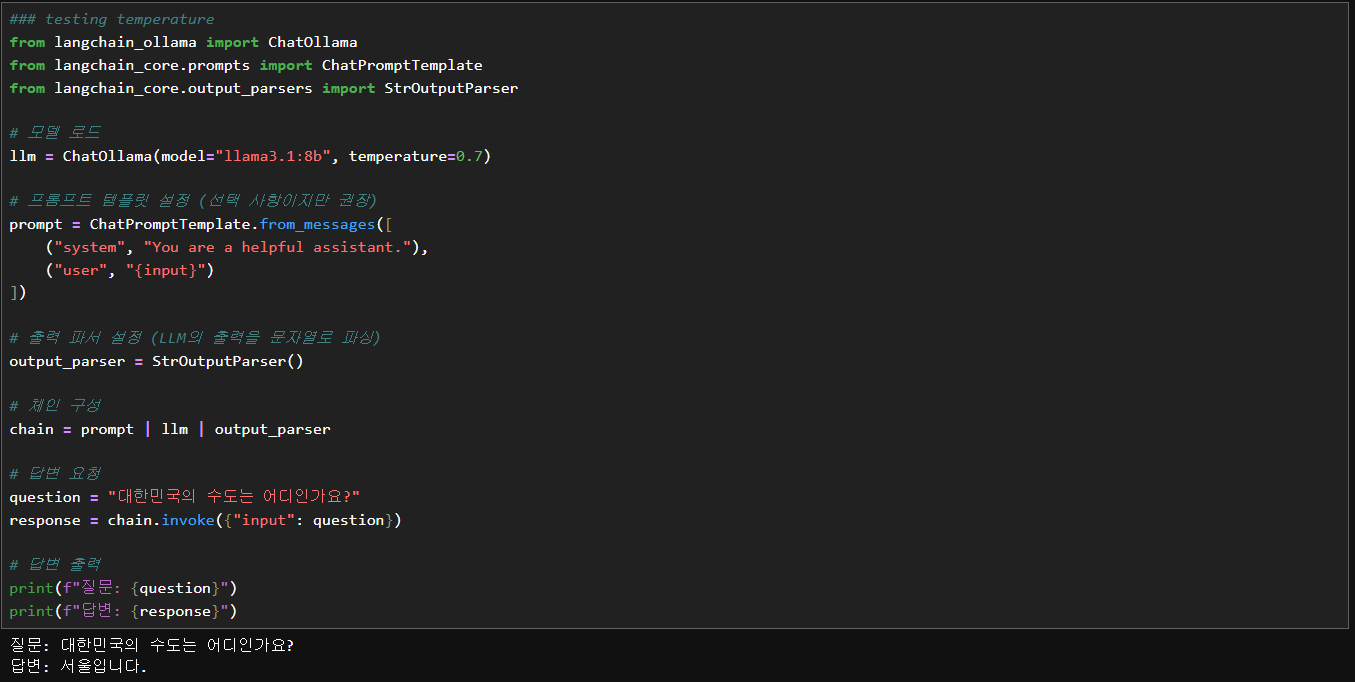
ChatOllama 파라미터
| 파라미터 | 설명 |
|---|---|
| model | 사용할 모델 이름 (예: llama3, mistral, qwen2 등) |
| temperature | 응답의 창의성/무작위성 제어 (0에 가까울수록 결정적, 1에 가까울수록 다양함) |
| num_predict | 생성할 최대 토큰 수 (예: 256, -1: 무제한, -2: 컨텍스트 한도까지) |
| base_url | Ollama 서버 주소 (기본값: http://localhost:11434) |
| format | 응답 포맷 지정 (예: "json"으로 설정 시 JSON 형식 응답 유도) |
| top_k | 다음 토큰 예측 시 확률 상위 K개 후보 중 선택 (예: 40) |
| top_p | 누적 확률 P 이상이 되는 토큰 집합에서 샘플링 (예: 0.9) |
| num_ctx | 한 번에 처리할 수 있는 최대 컨텍스트 길이 (토큰 단위, 예: 2048) |
| repeat_penalty | 반복되는 단어에 대한 패널티 부여 (예: 1.1) |
| stop | 응답 생성을 중단할 문자열 리스트 (예: ["\n", "Question:"]) |
| keep_alive | 모델을 메모리에 유지할 시간 (예: "5m", "0", "-1") |
| mirostat | Mirostat 샘플링 모드 (0: 비활성화, 1: Mirostat v1, 2: Mirostat v2) |
| mirostat_eta | Mirostat 학습률 조정 값 (예: 0.1) |
| mirostat_tau | Mirostat 목표 perplexity 값 (예: 5.0) |
| num_gpu | 사용할 GPU 레이어 수 (예: 0은 CPU만, -1은 전체 GPU 활용) |
| seed | 난수 시드 값 설정 (예: 42, 동일 입력에 대해 동일 응답 생성 유도) |
ChatOllama 파라미터 상세 설명
1. model
-
설명: Ollama 서버에서 사용할 LLM의 이름을 지정합니다. (예:
llama3:8b,qwen2:7b-instruct,mistral:latest) -
특징:
- 반드시
ollama pull <모델명>을 통해 모델이 로컬에 설치되어 있어야 합니다. - 모델마다 학습 특성과 강점(예: 코딩, 추론, 언어)이 다르며 시스템 자원 요구량(RAM/VRAM)도 상이합니다.
:8b,:instruct등은 버전, 튜닝 방식, 크기를 나타냅니다.- 선택 요령: 작업 목적(대화, 생성, 분석 등)과 시스템 사양을 고려해 선택해야 합니다.
- 반드시
2. temperature
-
설명: 생성 응답의 무작위성 또는 창의성 조절 (0.0 ~ 1.0)
-
특징:
- 낮음 (0.0~0.3): 결정론적, 일관된 응답에 유리 (요약, 코드 등)
- 중간 (0.5~0.7): 자연스러운 대화, 균형 잡힌 생성
- 높음 (0.8~1.0): 창의성/무작위성 증가, 브레인스토밍에 유리
- 0에 가까울수록
top_k,top_p의 효과가 줄어듭니다.
3. base_url
-
설명: Ollama 서버의 주소를 설정 (기본:
http://localhost:11434) -
특징:
- Docker, 원격 서버에서 사용할 경우 해당 IP\:PORT로 설정 필요
4. format
-
설명: 출력 포맷을 지정 (예:
json) -
특징:
"json"지정 시 모델은 JSON 형식 출력을 시도함- 프롬프트에 JSON 형식 응답 요청을 명시해야 정확도 향상
5. top_k
-
설명: 다음 토큰 후보 중 확률 상위
K개만 고려 -
특징:
- 작은 값은 보수적, 큰 값은 다양성 증가
- 일반적으로
top_p와 병용하거나 둘 중 하나만 사용
6. top_p (Nucleus Sampling)
-
설명: 누적 확률이
p이상일 때까지 토큰을 후보로 포함 -
특징:
- 동적 범위 지정 (확률이 뾰족할수록 후보군이 작아짐)
- 보통 0.9 ~ 0.95 사이가 안정적
7. num_ctx
-
설명: 컨텍스트 길이 제한 (토큰 단위)
-
특징:
- 모델의 최대 입력 크기를 결정함 (예: 2048)
- 긴 문서 요약, 긴 대화 등에 중요
8. repeat_penalty
-
설명: 동일한 문구 반복 방지를 위한 패널티 (기본: 1.1)
-
특징:
- 1.0은 패널티 없음, 1.1~1.5는 반복 억제
- 과도한 설정은 표현력을 제한할 수 있음
9. stop
-
설명: 특정 문자열이 출력되면 응답 생성 중단
-
특징:
- 예:
["\n", "User:"] - LangChain은
stop토큰 이후 텍스트를 제거함
- 예:
10. num_predict
-
설명: 생성할 최대 토큰 수 지정
-
특징:
-1: 무제한,-2: 최대 컨텍스트 채움- 일반적으로는 128~1024 범위에서 설정
11. keep_alive
-
설명: 모델을 메모리에 유지할 시간 (예:
"5m","0","-1") -
특징:
- 빈번한 요청에는
5m이상이 적절 - 드물게 사용하는 모델은
0으로 설정해 메모리 해제 가능
- 빈번한 요청에는
12. mirostat, mirostat_eta, mirostat_tau
-
설명:
mirostat: 샘플링 알고리즘 설정 (0: 비활성, 1: Mirostat, 2: Mirostat 2.0)eta: 학습률 (0.1 권장)tau: 목표 perplexity (5.0 권장)
-
특징:
temperature/top_p보다 정밀 제어 가능- 고급 사용자에게 적합
13. num_gpu
-
설명: 모델을 GPU에 올릴 레이어 수 설정
-
특징:
0: CPU만 사용,-1: 가능한 전체 레이어를 GPU에 할당- GPU 가용성 및 VRAM 고려 필수
14. seed
-
설명: 동일한 입력에 대해 동일 출력을 보장하기 위한 난수 시드 값
-
특징:
- 테스트, 디버깅, 회귀 검증 시 유용
temperature가 낮을수록seed효과가 잘 드러남
📌 참고: system, human, assistant 메시지는 파라미터가 아닌 메시지 역할입니다.
messages = [
  ("system", "You are a helpful assistant."),
  ("human", "What's the weather in Seoul?")
]

llm.invoke(messages)- 이는
ChatOllama의invoke()또는stream()메서드에 전달하는 입력 형식입니다. - LangChain에서는
ChatPromptTemplate을 통해 역할 기반 메시지를 관리할 수 있습니다.
(참고) ChatOllama vs ChatPromptTemplate 차이와 용도 비교
| 항목 | ChatOllama | ChatPromptTemplate |
|---|---|---|
| 정의 | Ollama를 통해 실행되는 LLM 모델 래퍼 (LLM 호출기) | 시스템 메시지, 사용자 메시지 등으로 구성된 대화형 프롬프트 생성기 |
| 역할 | LLM을 실제로 실행하여 응답을 생성 | 프롬프트 메시지들을 체계적으로 구성하고 포맷팅 |
| 주요 기능 | .invoke(), .stream() 등을 통해 LLM 실행 | .format_messages(), .format() 등을 통해 structured message 생성 |
| 사용 시점 | 모델이 응답을 생성해야 할 때 | 프롬프트를 동적으로 구성하거나, 역할/문맥을 구조화할 때 |
| 비유 | 대답하는 사람 (모델) | 질문을 만들어주는 사람 (프롬프트 빌더) |
(참고) 🎯 언제 각각을 써야 하는가?
-
ChatPromptTemplate은 프롬프트를 명확히 설계하거나 시스템 역할, 사용자 입력을 구분하고 싶을 때 사용합니다.- 예: 시스템 역할이
"You are a translator"이고, 사용자 입력은 변수로 받는 번역기 구성 등
- 예: 시스템 역할이
-
ChatOllama는 모델을 실행할 때 반드시 필요합니다.- 실제 응답을 받고 싶을 때
.invoke(),.stream()등을 호출
- 실제 응답을 받고 싶을 때
-
보통은 이 둘을 조합해서 체인으로 사용합니다:
prompt = ChatPromptTemplate.from_messages([...]) # 정의
llm = ChatOllama(model="llama3") # 선언
chain = prompt | llm # 체인
🧪 LangChain + Ollama 종합 실습 가이드
1. 💬 시스템 프롬프트 기반 번역기
ChatPromptTemplate을 통해 다양한 역할(system)을 설정한 프롬프트 템플릿을 사용할 수 있습니다.
from langchain_core.prompts import ChatPromptTemplate
# from langchain_community.chat_models import ChatOllama
from langchain_ollama import ChatOllama

# 1. 프롬프트 템플릿 정의
prompt = ChatPromptTemplate.from_messages([
    ("system", "You are a translator from English to Korean."),
    ("human", "{sentence}")
])

# 2. LLM 모델 정의 (Ollama 기반)
llm = ChatOllama(model="llama3.1:8b")

# 3. 체인 구성
chain = prompt | llm

# 4. 실행
result = chain.invoke({"sentence": "I love programming."})
print(result.content)  # 나는 프로그래밍을 좋아합니다.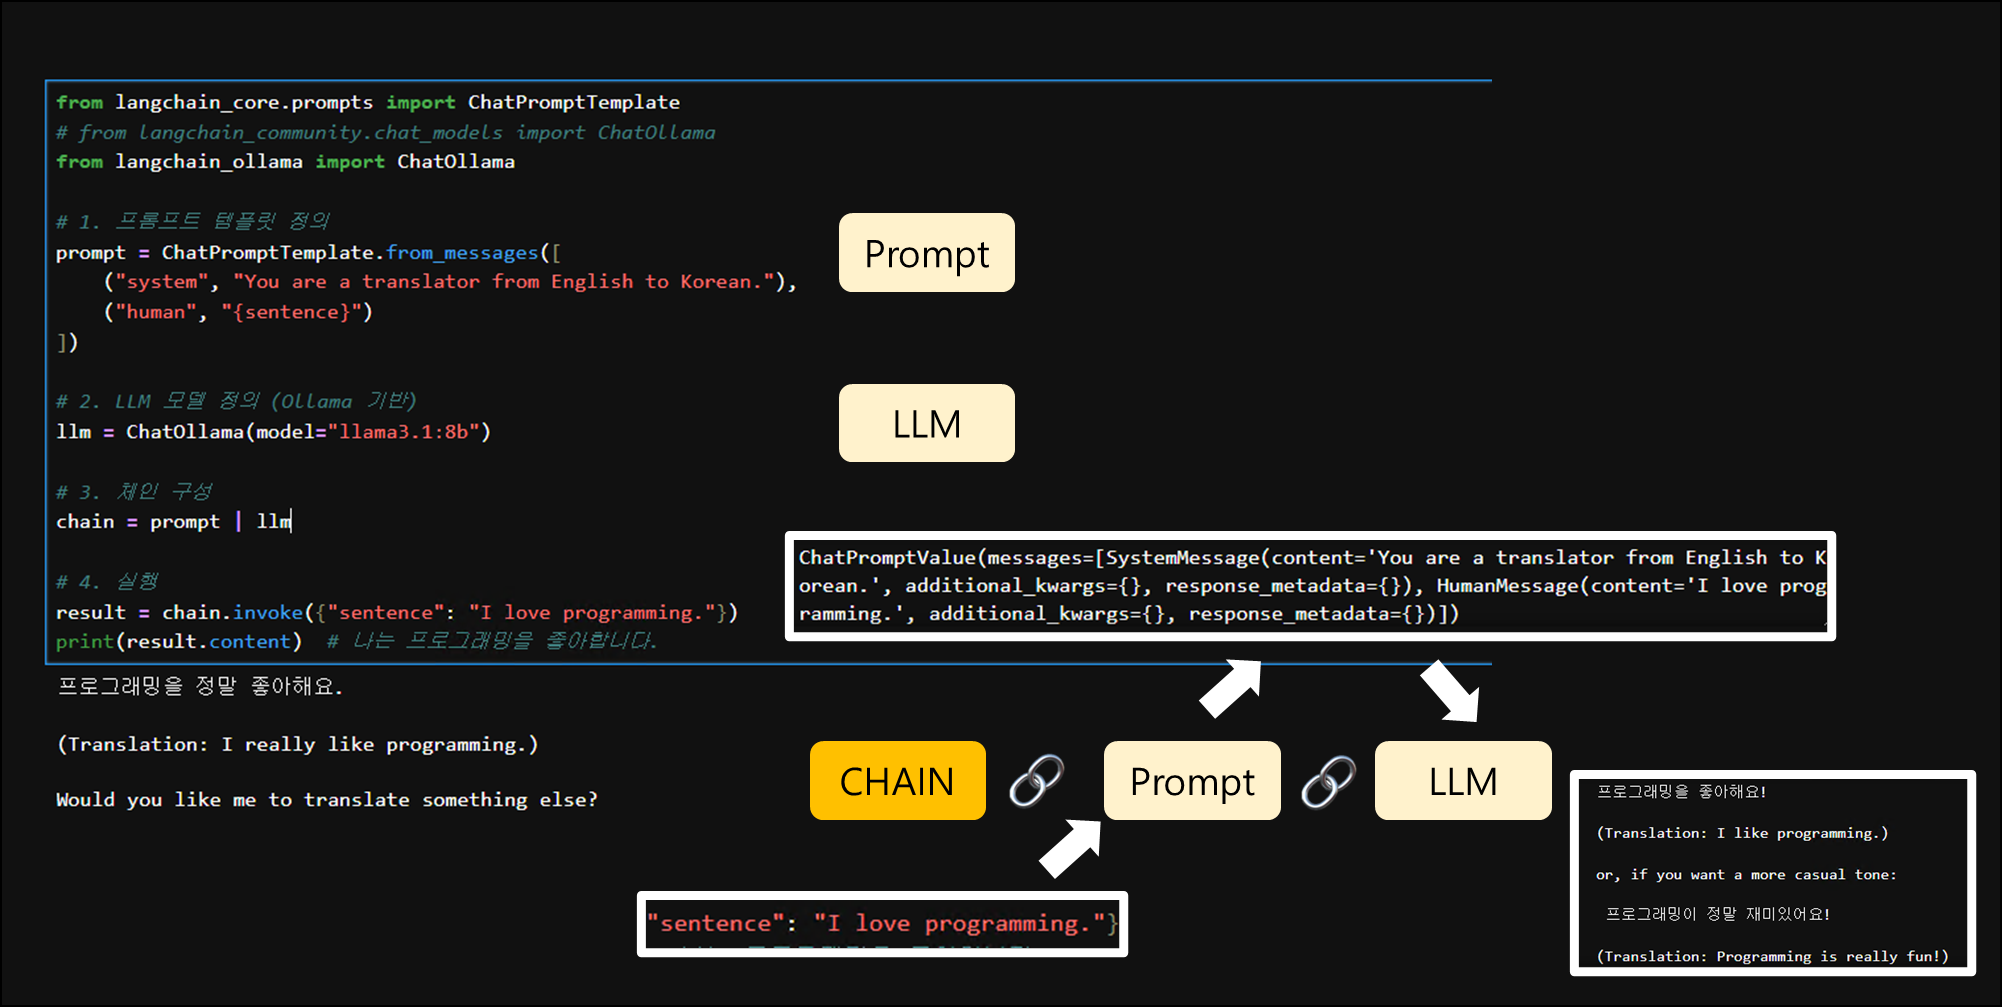
2. 🖥️ .invoke() 함수 사용하기
- LangChain의
.invoke()메서드를 가장 단순하고 직관적으로 보여줍니다.
코드
from langchain_ollama import ChatOllama

llm = ChatOllama(model="llama3.1:8b")

response = llm.invoke("Where is the nearest train station in Kingston, London?")
print(response.content)
답변
Kingston upon Thames has several train stations. The two main ones are:

1. **Kingston Railway Station**: This is the primary railway station serving Kingston and is located on London Road, near the town centre. It's operated by Southern and Thameslink trains.
2. **Norbiton Station** (about 0.8 miles from Kingston Centre): Although not in the very heart of Kingston, this station offers a convenient alternative for those living nearby.

Both stations offer frequent services to central London, as well as other destinations in South London and beyond.

To get to either of these stations, you can use online journey planners like National Rail or Transport for London (TfL) Journey Planner.

If you're looking for the nearest train station from a specific location within Kingston, I'd be happy to help with more precise directions!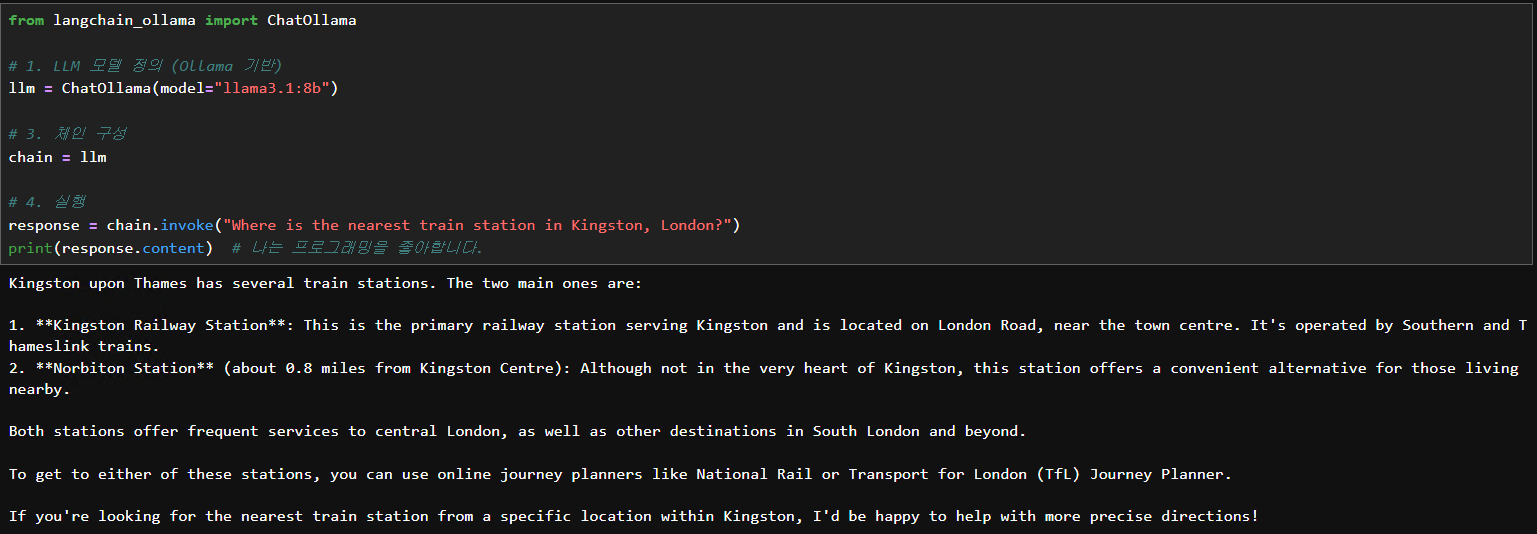
3. 🛠️ Tool Calling 기능 (도구 자동 호출)
@tool: 함수를 LangChain에서 사용 가능한 툴로 등록.bind_tools(): LLM에 도구 사용 권한 부여.invoke(): 유저 입력에 따라 LLM이 툴 사용 여부 판단response.tool_calls: LLM이 호출할 도구와 파라미터를 명시한 지시tool.invoke(args): 도구를 수동 실행하여 실제 결과 생성
from langchain_core.tools import tool
from langchain_ollama import ChatOllama

@tool
def check_balance(account_id: int) -> str:
    """Check the balance of a bank account by its ID."""
    return f"Account {account_id} has $5,000."

llm = ChatOllama(model="llama3.1:8b").bind_tools([check_balance])

response = llm.invoke("Check the balance for account 1234.")

print("########################")
print(response.tool_calls)
print("########################")

# tool_calls만 있으면, LLM이 판단만 했다는 뜻 → 실제 실행은 우리가 직접
if response.tool_calls:
    for call in response.tool_calls:
        tool_name = call["name"]
        args = call["args"]

        # 여기서 실제 실행
        if tool_name == "check_balance":
            result = check_balance.invoke(args)
            print(f"✅ Tool 실행 결과: {result}")
logic flow
[유저 입력]
  ↓
LLM 분석 → "도구가 필요해!"
  ↓
tool_calls 반환 (함수 이름 + 파라미터)
  ↓
개발자가 직접 tool 실행 (invoke)
  ↓
실행 결과 출력 or 후속 대화로 전달
실행 결과 예시:
########################
[
  {'name': 'check_balance',
   'args': {'account_id': 1234},
   'id': 'f62b110c-9d9c-4500-a753-4b5afcf2dfd1',
   'type': 'tool_call'}
]
########################

✅ Tool 실행 결과: Account 1234 has $5,000.
😸 이 구조는 멀티스텝 Agent로 확장될 수 있으며, LangGraph에서는
tool 호출→실행→후속 프롬프트자동 흐름도 구성 가능합니다.
참고 - langraph 적용
(작성 구조)
[entry: llm_call]
       ↓
(tool_call 있음?) ── Yes → [tool_execute] → [llm_continue] → END
         │
         └── No  → [end_or_output] → END
from typing import TypedDict, List, Dict
from langgraph.graph import StateGraph, END
from langchain_core.tools import tool
from langchain_ollama import ChatOllama
@tool
def check_balance(account_id: int) -> str:
"""Check the balance of a bank account by its ID."""
return f"Account {account_id} has $5,000."
llm = ChatOllama(model="llama3.1:8b").bind_tools([check_balance])
# -----------------------
# 상태 정의
# -----------------------
class AgentState(TypedDict):
messages: List[Dict]
tool_calls: List[Dict]
tool_results: List[Dict]
# -----------------------
# 노드 함수 정의
# -----------------------
def llm_call(state: AgentState) -> AgentState:
response = llm.invoke(state["messages"])
return {
"messages": state["messages"] + [response],
"tool_calls": response.tool_calls,
"tool_results": []
}
def tool_execute(state: AgentState) -> AgentState:
results = []
for call in state["tool_calls"]:
if call["name"] == "check_balance":
result = check_balance.invoke(call["args"])
results.append({"tool": call["name"], "output": result})
return {**state, "tool_results": results}
def llm_continue(state: AgentState) -> AgentState:
tool_msgs = [
{"role": "tool", "tool_call_id": call["id"], "content": res["output"]}
for call, res in zip(state["tool_calls"], state["tool_results"])
]
response = llm.invoke(state["messages"] + tool_msgs)
return {"messages": state["messages"] + tool_msgs + [response]}
def return_as_is(state: AgentState) -> AgentState:
return state # LLM만 호출 후 끝낼 경우
# -----------------------
# 그래프 구성
# -----------------------
builder = StateGraph(state_schema=AgentState)
builder.add_node("llm_call", llm_call)
builder.add_node("tool_execute", tool_execute)
builder.add_node("llm_continue", llm_continue)
builder.add_node("skip_tool", return_as_is)
builder.set_entry_point("llm_call")
# 조건 분기 추가 (tool_call이 있는지 여부에 따라)
def has_tool(state: AgentState) -> str:
return "yes" if state["tool_calls"] else "no"
builder.add_conditional_edges(
"llm_call",
has_tool,
{
"yes": "tool_execute",
"no": "skip_tool"
}
)
builder.add_edge("tool_execute", "llm_continue")
builder.add_edge("llm_continue", END)
builder.add_edge("skip_tool", END)
graph = builder.compile()
graph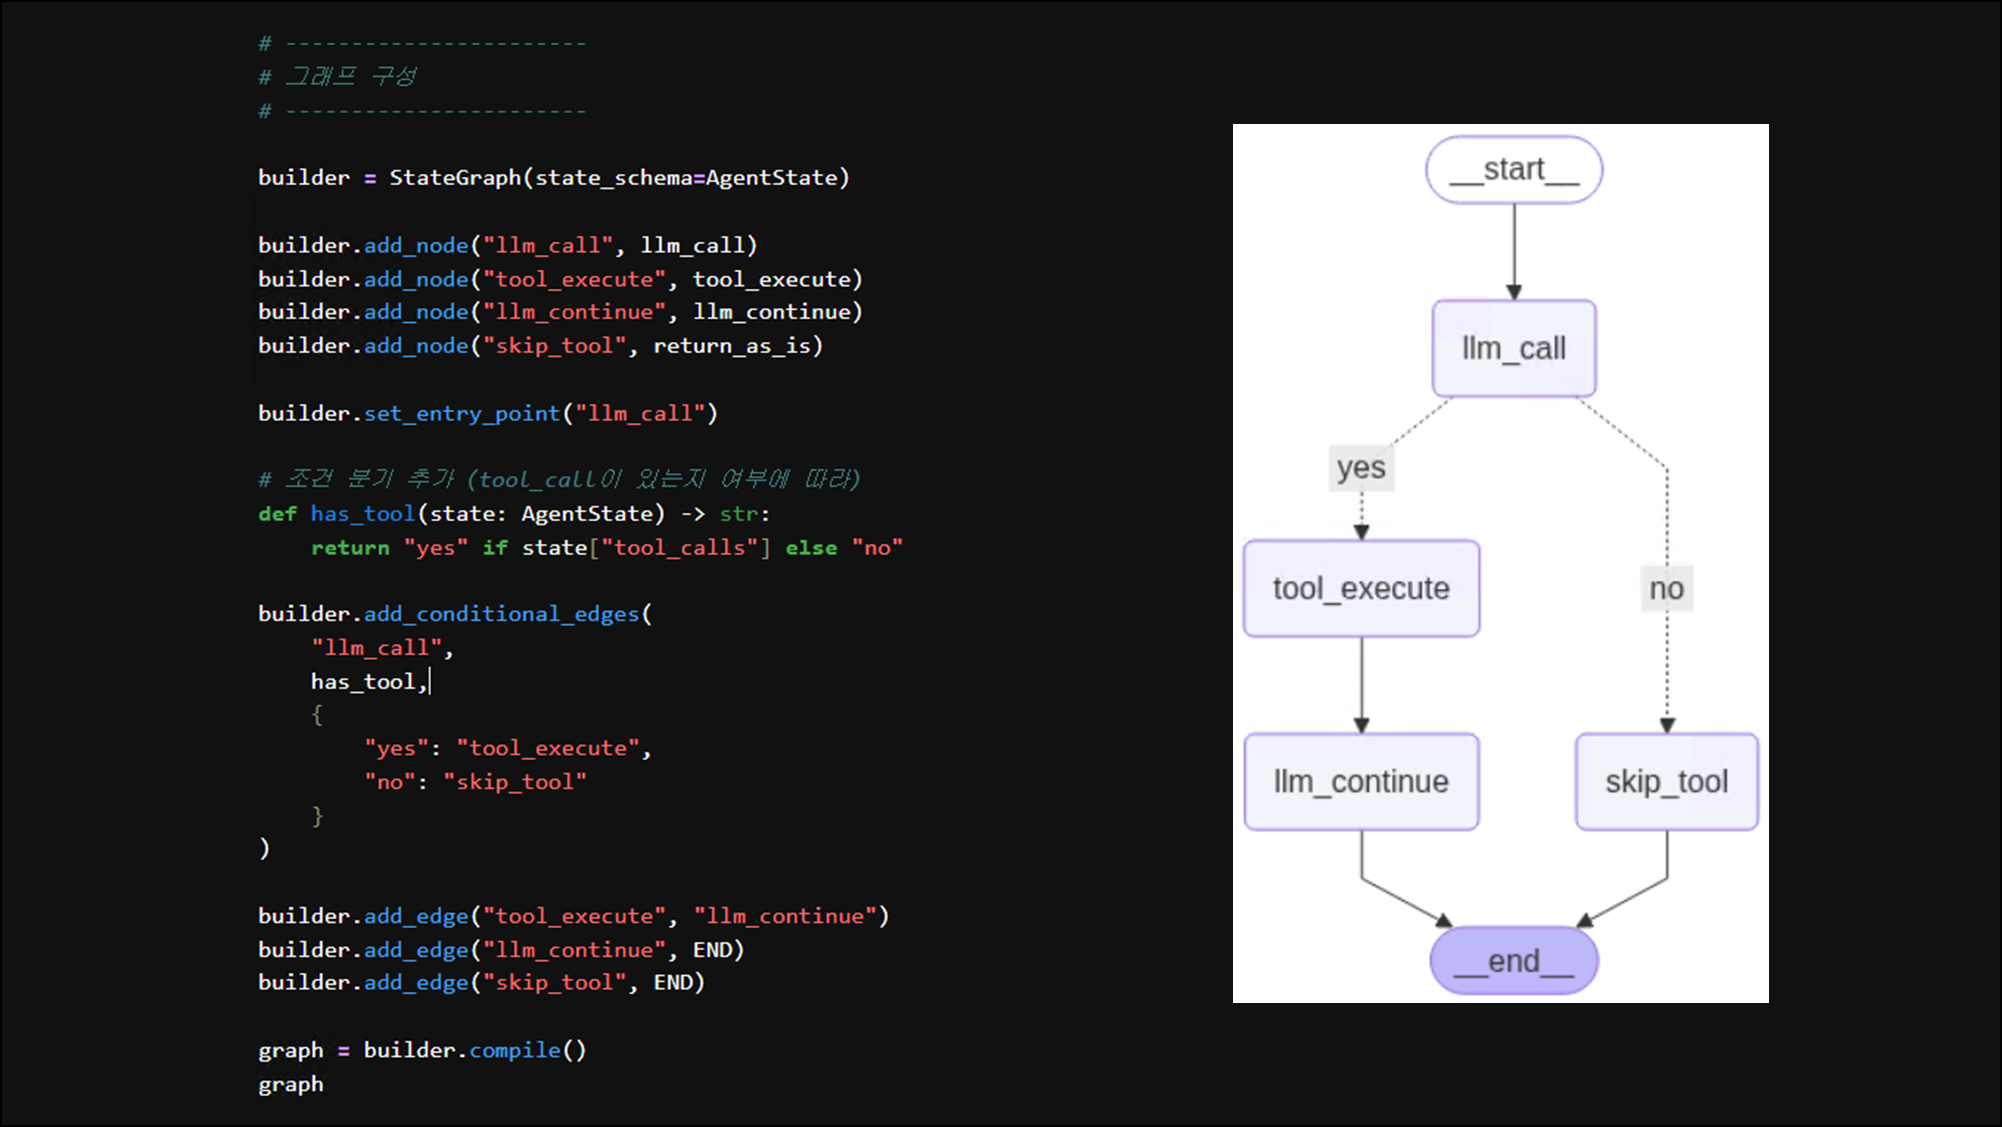
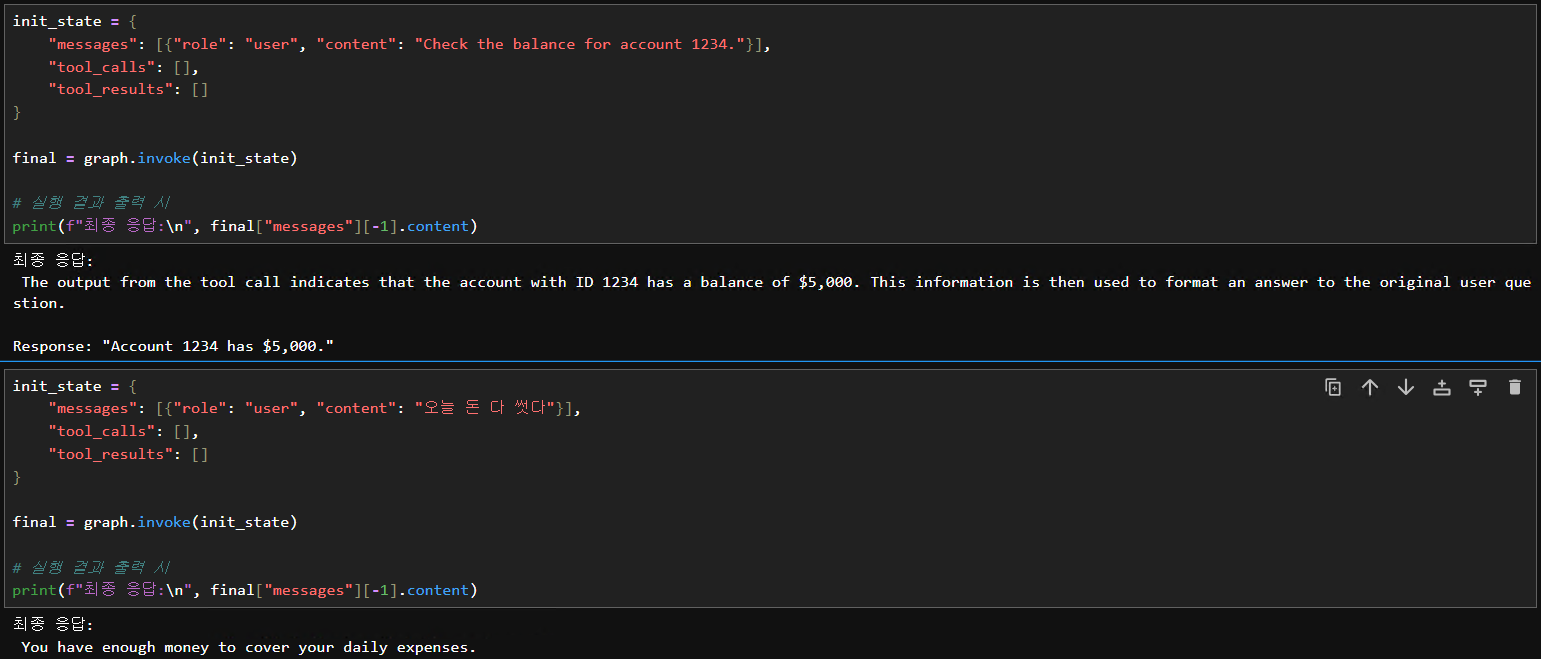
이렇게 하면 요청한 질의문에 따라서 분기를 쳐서 답변해주는 것을 확인할 수 있음:
4. 🧠 멀티 메시지 대화 (invoke(messages)) - langchain
핵심 아이디어:
- 대화 내용을 저장할 리스트 (
chat_history)를 유지합니다. - 매번 LLM을 호출할 때, 시스템 메시지와 함께
chat_history의 최근 N개 메시지, 그리고 현재 사용자의 새 메시지를 함께 전달합니다. - LLM의 응답도
chat_history에 추가하여 다음 대화에 활용합니다.
from langchain_core.messages import SystemMessage, HumanMessage, AIMessage
from langchain_ollama import ChatOllama

# LLM 초기화
llm = ChatOllama(model="llama3.1:8b")

# 1. 시스템 메시지 정의
system_message = SystemMessage(content="You are a helpful AI assistant who remembers the last few turns of our conversation.")

# 2. 대화 내용(Chat History)을 저장할 리스트
chat_history = []

# 3. LLM에 전달할 최근 메시지 개수 설정 (예: 최근 4개 메시지 = 2턴의 대화)
#    이 값을 조절하여 얼마나 많은 과거 대화를 LLM이 기억하게 할지 결정할 수 있습니다.
#    (시스템 메시지는 항상 포함되므로, 실제로는 이 개수 + 1개의 메시지가 전달됨)
MAX_HISTORY_MESSAGES = 4

print("AI Assistant: 안녕하세요! 대화를 시작해 보세요. (종료하려면 'quit'을 입력하세요)")

while True:
    user_input = input("나: ")
    if user_input.lower() == 'quit':
        print("AI Assistant: 대화를 종료합니다.")
        break

    current_human_message = HumanMessage(content=user_input)

    # 4. LLM에 전달할 메시지 리스트 구성
    messages_to_llm = [system_message] # 항상 시스템 메시지로 시작

    # 최근 대화 기록 추가 (가장 오래된 것부터 순서대로)
    # chat_history에서 최근 MAX_HISTORY_MESSAGES 개수만큼 가져옴
    recent_history = chat_history[-MAX_HISTORY_MESSAGES:]
    messages_to_llm.extend(recent_history)

    messages_to_llm.append(current_human_message) # 현재 사용자 메시지 추가

    # 디버깅: LLM에 전달되는 메시지 확인
    # print("\n--- LLM에 전달되는 메시지 ---")
    # for msg in messages_to_llm:
    #     print(f"{msg.type}: {msg.content}")
    # print("---------------------------\n")

    # 5. LLM 호출
    ai_response = llm.invoke(messages_to_llm)

    print(f"AI Assistant: {ai_response.content}")

    # 6. 현재 사용자의 메시지와 AI의 응답을 chat_history에 추가
    chat_history.append(current_human_message)
    chat_history.append(ai_response) # AIMessage 객체 그대로 추가

    # (선택적) 너무 많은 히스토리가 쌓이는 것을 방지하기 위해 오래된 히스토리 제거
    # 예를 들어, chat_history의 최대 길이를 10개 메시지 (5턴)로 유지
    # MAX_TOTAL_HISTORY = 10
    # if len(chat_history) > MAX_TOTAL_HISTORY:
# chat_history = chat_history[-MAX_TOTAL_HISTORY:]-
system_message: LLM의 역할이나 행동 지침을 설정합니다. 이 메시지는 매번 LLM 호출 시 메시지 리스트의 가장 앞에 위치합니다. -
chat_history: HumanMessage와 AIMessage 객체를 순서대로 저장하는 리스트입니다. 이것이 우리의 간단한 채팅 히스토리 저장소 역할을 합니다. -
MAX_HISTORY_MESSAGES: LLM에게 전달할 chat_history 내 최근 메시지의 최대 개수를 의미합니다.- 예를 들어 4로 설정하면, 가장 최근의 4개 메시지 (보통 사용자 질문 2개 + AI 답변 2개)가 시스템 메시지 및 현재 사용자 질문과 함께 전달됩니다. 이 값을 통해 LLM이 얼마나 "기억"할지 조절할 수 있습니다.
(참고) LangGraph의 checkpointer를 사용하면 위 코드에서 chat_history를 직접 메모리에 유지하지 않아도, 상태(state) 안에 저장된 메시지 이력을 자동으로 저장하고 복원할 수 있습니다.
✅ LangGraph Checkpointer의 장점
| 기능 | 설명 | 예시 |
|---|---|---|
| ✅ 지속성 | 세션 상태를 저장하여 언제든지 복원 가능 | 사용자가 다시 접속했을 때도 이전 대화 이어가기 |
| ✅ 세션 관리 | thread_id를 통해 사용자별 세션 분리 | 유저 A, 유저 B의 대화 이력을 동시에 관리 가능 |
| ✅ 확장성 | Redis, Postgres, MongoDB 등과 연동 가능 | 서비스 규모 확장 시에도 안정적으로 상태 관리 |
| ✅ 자동 흐름 저장 | 각 노드 실행 후 상태를 자동 체크포인트 | 대화 흐름이 끊겨도 이어서 실행 가능 (resume) |
| ✅ 기억 범위 조절 | 상태 내 메시지 수 제한 또는 요약 가능 | LLM context 제한에 맞춰 최근 N개만 유지 |
5. 🌊 토큰 스트리밍 (동기 버전)
from langchain_community.chat_models import ChatOllama

# streaming=True로 LLM을 초기화합니다.
llm = ChatOllama(model="llama3.1:8b", streaming=True)

print("AI가 이야기를 시작합니다...")
# llm.stream()을 사용하여 응답을 스트리밍으로 받습니다.
for chunk in llm.stream("Tell me a story about a fox and a cat."):
    # chunk.content에 현재 수신된 텍스트 조각이 들어있습니다.
    # end=""는 print 함수가 자동으로 줄바꿈하는 것을 방지합니다.
    # flush=True는 출력 버퍼를 즉시 비워 화면에 바로 표시되도록 합니다.
    print(chunk.content, end="", flush=True)
print("\n이야기 끝!")-
streaming=True (LLM 초기화 시):-
작동 원리:
ChatOllama(..., streaming=True)와 같이 LLM을 초기화할 때 streaming 옵션을 True로 설정하면, LLM에게 응답을 생성하는 즉시 작은 조각(chunk 또는 token) 단위로 보내달라고 요청하는 것입니다. LLM은 전체 응답이 완성될 때까지 기다리지 않고, 생성되는 부분부터 순차적으로 클라이언트에게 전달합니다. -
llm.stream()과의 관계: 이streaming=True설정은llm.stream()메소드와 함께 사용될 때 의미가 있습니다. llm.stream()은 이렇게 스트리밍 방식으로 전달되는 응답 조각들을 순회할 수 있는 반복자(iterator)를 반환합니다. for chunk in llm.stream(...) 구문을 통해 각 조각을 실시간으로 받을 수 있습니다.
-
-
print(..., flush=True) (출력 시):- print() 함수의 flush 매개변수: 이것은 Python의 내장 print() 함수에 있는 옵션입니다. 기본적으로 flush=False입니다.
flush=True의 역할:print(..., flush=True)를 사용하면, print 함수가 호출될 때마다 출력 버퍼의 내용을 즉시 강제로 비우고 해당 내용을 화면(또는 다른 출력 대상)으로 보내도록 합니다.- 따라서
end=""와 함께flush=True를 사용하면, 스트리밍으로 수신되는 각 텍스트 조각(chunk.content)이print되는 즉시 화면에 나타나게 되어, 마치 타자 치듯이 실시간으로 텍스트가 표시되는 효과를 얻을 수 있습니다.
🧭 마무리
ChatOllama를 활용하면 로컬에서 실행 중인 Ollama 모델을 LangChain 체인에 손쉽게 통합할 수 있으며,
이를 통해 대화형 에이전트, 툴 연동, 스트리밍 출력 등 다양한 기능을 구현할 수 있습니다.
다음 포스트에서는 LangChain의 상위 개념인 LangGraph를 복습하고,
실제 워크플로우 설계와 상태 기반 에이전트 구현에 대해 정리해볼 예정입니다.
LangChain의 구조적 구성과 SLM 기반 응용에 관심 있는 분들에게도 많은 도움이 되셨길 바랍니다. 🥁
읽어주셔서 감사합니다!