1. 모든 객체(숫자, 문자열, 객체, 배열, 함수 등)는 내부 프로퍼티인 [[Prototype]]를 가지고 있습니다.
프로토타입 관련 참고 포스팅(클릭하면 해당 포스팅으로 이동합니다.)
☞ [JavaScript]프로토타입(Prototype)이란?
☞ [JavaScript]프로토타입 체인(Prototype Chain)
☞ [JavaScript]함수의 프로토타입(prototype in function)
Prototype은 현재 객체의 상위 객체를 참조하며, 이 상위 객체를 프로토타입이라고 말합니다. 그리고 프로토타입 체인으로 상위 객체를 계속해서 참조했을 때, 프로토타입 체인의 종점은 Object.prototype 객체입니다. 즉, JavaScript의 모든 객체는 Object.prototype 객체에 존재하는 프로퍼티와 메서드를 접근할 수 있습니다.
JavaScript는 사용자 정의 객체가 아닌 Object.prototype 객체와 같은 표준 프로토타입 객체에도 개발자가 메서드를 추가할 수 있습니다. 따라서, 모든 객체는 Object.prototype 객체에 개발자가 추가한 프로퍼티를 접근할 수 있습니다.
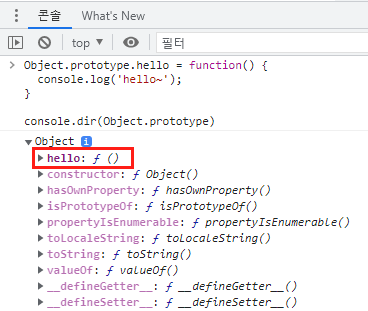
다음 예제는 Object.prototype 객체에 개발자가 추가한 함수를 호출합니다.
Object.prototype.hello = function() {
  console.log('hello~');
}
var arr = [];
var obj = {};
var num = new Number(10);
arr.hello(); // hello~
obj.hello(); // hello~
num.hello(); // hello~
Object.prototype 객체의 프로퍼티를 확인해보면 개발자가 추가한 hello 함수를 확인할 수 있습니다.
2. 프로토타입 확장의 장점
JavaScript에서 함수를 클래스처럼 구현할 수 있습니다. 다음 예제는 함수를 클래스처럼 구현하고 new 연산자를 사용하여 객체를 생성합니다.
function UserInfo(name, age) {
this._name = name;
this._age = age;
this.getName = function() {
return this._name;
}
this.setName = function(value) {
this._name = value;
}
this.getAge = function() {
return this._age;
}
this.setAge = function(value) {
this._age = value;
}
}
var user1 = new UserInfo('Bob', 20);
var user2 = new UserInfo('Tom', 24);
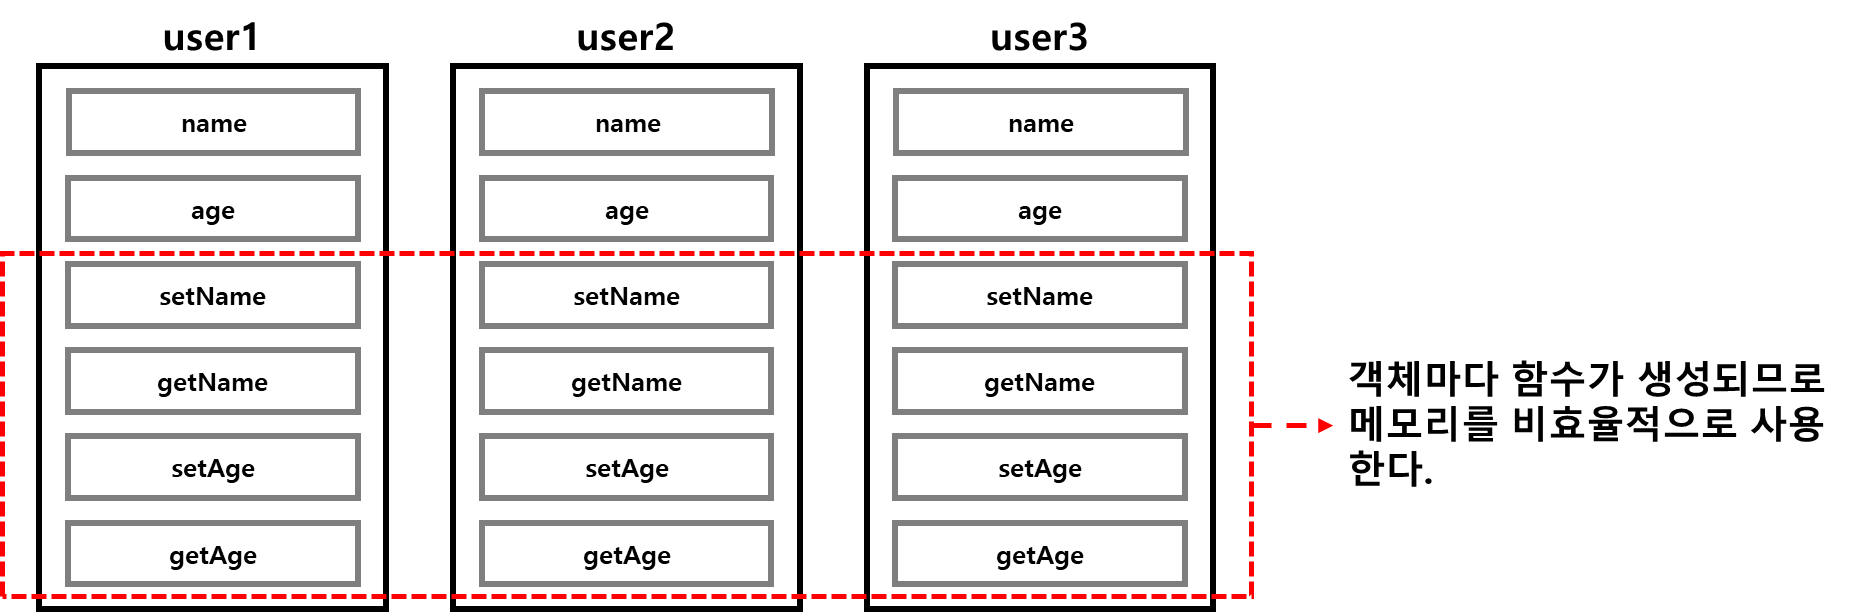
var user3 = new UserInfo('Nick', 63);위 예제는 문제없이 정상적으로 동작 하지만, 한 가지 문제가 있습니다. 메모리를 불필요하게 사용한다는 점이죠.
위 예제를 실행하면 다음 그림처럼 세 개의 객체가 생성되고 객체마다 프로퍼티와 함수가 존재합니다.
 함수를 객체에 생성하지 않고 공통적으로 사용할 수 있는 영역에 할당하기 위해 프로토타입을 활용할 수 있습니다.
function UserInfo(name, age) {
  this._name = name;
  this._age = age;
}
UserInfo.prototype.getName = function() {
  return this._name;
}
UserInfo.prototype.setName = function(value) {
  this._name = value;
}
UserInfo.prototype.getAge = function() {
  return this._age;
}
UserInfo.prototype.setAge = function(value) {
  this._age = value;
}
var user1 = new UserInfo('Bob', 20);
var user2 = new UserInfo('Tom', 24);
var user3 = new UserInfo('Nick', 63);
UserInfo 함수 객체의 prototype 프로퍼티에 함수를 정의함으로써 객체에는 함수가 생성되지 않고 프로토타입 체인으로 함수를 접근할 수 있습니다.
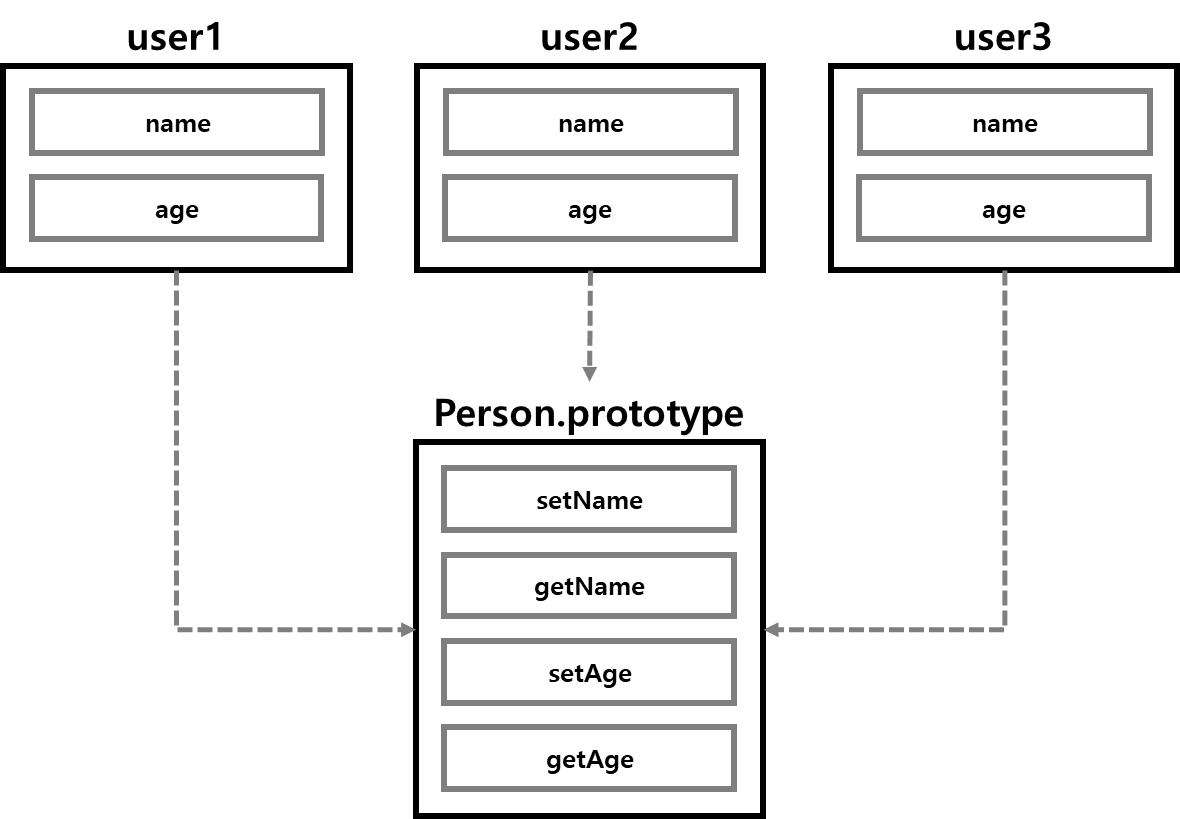
따라서, 메모리를 효율적으로 사용할 수 있습니다.
3. Standalone Utility Function
내장 객체를 확장하는 대신 코드베이스 전체에서 가져오고 사용할 수 있는 유틸리티 함수를 만드는 것이 좋습니다.
이 접근 방식은 내장된 Array 객체를 수정하지 않고 다른 라이브러리나 개발자 코드와의 잠재적인 충돌을 방지하기 때문에 더 안전하고 유지보수가 쉽습니다.
예를 들어, 유틸리티 함수를 만들어 Array.prototype을 수정하지 않고 배열의 특정 항목을 교체하는 것입니다. 아래 코드는 위 Array.prototype 을 확장하던 코드를 유틸리티 함수로 구현한 코드입니다.
// utils/array.ts
type NestedArray<T> = Array<T | NestedArray<T>>;
const replace = <T>(array: NestedArray<T>, oldValue: T, newValue: T): NestedArray<T> => {
  if (Array.isArray(array)) {
    let replaced = false;
    return array.map((item) => {
      if (!replaced && item === oldValue) {
        replaced = true;
        return newValue;
      }
      return item;
    });
  }
  return array;
};
const replaceAll = <T>(array: NestedArray<T>, oldValue: T, newValue: T): NestedArray<T> => {
  if (Array.isArray(array)) {
    return array.map((item) => {
      if (item === oldValue) {
        return newValue;
      } else if (Array.isArray(item)) {
        return replaceAll(item, oldValue, newValue);
      } else {
        return item;
      }
    });
  }
  return array;
};
export { replace, replaceAll };
이 유틸리티 함수들을 사용하기 위해 가져옵니다.
// main.ts
import { replace, replaceAll } from './utils/array';
const arr1 = [1, [2, 1]];
const arr2 = [10, '2', '2', '1'];
console.log(replace(arr1, 2, 3)); // Output: [1, [2, 1]]
console.log(replaceAll(arr1, 2, 3)); // Output: [1, [3, 1]]
console.log(replace(arr2, '2', '3')); // Output: [10, '3', '2', '1']
console.log(replaceAll(arr2, '2', '3')); // Output: [10, '3', '3', '1']
이렇게 하면 유틸리티 함수가 Array.prototype 을 수정하지 않으며 필요에 따라 가져와 사용할 수 있습니다.
4. Object.defineProperty()를 사용하여 객체를 보다 안전하게 확장
그래도 배열 인스턴스에서 호출해 사용하고 싶을 수도 있겠죠. 이럴 땐 Object.defineProperty()을 사용하여 더 안전하게 추가할 수 있습니다. Object.defineProperty() 정적 함수는 객체에 새로운 속성을 직접 정의하거나 이미 존재하는 속성을 수정한 후, 해당 객체를 반환합니다. 객체에 새 속성을 정의하고 속성을 지정하며 실수로 덮어쓰거나 하는 충돌을 방지할 수 있습니다.
아래 코드는 Object.defineProperty() 을 사용해 Array.prototype 에 replace 함수를 추가하는 예시 코드입니다.
const arr1 = [1, 2, 3, 2];
if (!Array.prototype.replace) {
  Object.defineProperty<unknown[]>(Array.prototype, 'replace', {
    value: function (oldValue: unknown, newValue: unknown) {
      let replaced = false;
      return this.map((item: unknown) => {
        if (!replaced && item === oldValue) {
          replaced = true;
          return newValue;
        }
        return item;
      });
    },
    configurable: true, // `true`로 설정하면 나중에 속성을 삭제하거나 변경할 수 있습니다.
  });
}
console.log(arr1.replace(2, 555)); // Output: [1, 555, 3, 2]
configurable 속성의 기본값은 false입니다. 따라서 정의된 속성을 재정의하려고 하면 "TypeError: Cannot redefine property: replace" 오류가 발생합니다 . 이 오류는 JavaScript가 속성의 재정의를 허용하지 않기 때문에 발생합니다.
이 오류를 방지하려면 먼저 속성이 이미 존재하는지 확인하면 됩니다. replace 함수가 Array.prototype에 이미 존재하는지 확인하는 것이죠. 존재하지 않는 경우 함수가 정의됩니다. 또한 configurable 속성을 true로 설정하여 속성을 다시 정의할 수 있도록 했습니다.
결론
개발자로서 JavaScript에서 표준 내장 객체 확장과 관련된 잠재적인 위험을 인지하는 게 중요합니다. 따라서 다음 번에 내장된 프로토타입을 수정하고 싶을 때는 다시 한 번 생각해 보고 더 안전한 대안을 고려해 보는 것을 추천드립니다.
- 프로토타입(=상위 객체)의 prototype 객체에 프로퍼티를 추가하는 것을 프로토타입 확장이라고 말합니다.
- 프로토타입 확장의 장점은 메모리를 효율적으로 사용할 수 있다는 점입니다.
- 유틸리티 함수와 보다 안전한
Object.defineProperty()함수를 사용하면 충돌을 방지하고 코드 유지보수성을 향상시킵니다.